One of the things I’ve had to adjust to here in my new locale is that there just are not as many options for food as there are in New York. Gone are the days where I can get a fresh bagel, have a banh mi for lunch, stop for a Macaron and coffee in the afternoon, have fresh sushi for dinner and then grab some cupcakes to go for a midnight snack. That’s probably been my biggest adjustment so far. The local bakery I work for does make cupcakes, but only for orders, so I can’t really just walk in there and get one out of the case. But I did hear of a place in a neighboring town, about an hour away that makes cupcakes. As a matter of fact this bakery, Cakes on Walnut, is a cupcake bar! This is a cool, funky idea and I never saw anything like it back home!
The space is clean and modern with lots of seating and artwork on display. There is also an adjoining art space where you can see more art on display. The display area for the cupcakes is lovely, as shown in the following photo. Behind the cupcakes, there is the coffee are and the bar area which were both pretty standard.

While I was there, I tried four different cupcakes. The pumpkin spice cupcake was by far the best one. It was moist with a nice balance of spice and pumpkin flavor and a sweet and tangy cream cheese icing. It was also great to see a seasonal offering.

The red velvet cupcake was also moist with a slight hint of cocoa flavor. The cream cheese icing was a nice complement, however the cocoa nibs on top were a bit overpowering. I found myself picking them off of the top of the cupcake. I then had their chocolate cupcake which was also nice.

Unfortunately, the most disappointing cupcake was the smores cupcake. The bottom layer of the cupcake was a thick, hard layer of graham cracker crust topped by the moist cupcake. And the entire cupcake was topped with bruleed marshmallows. This was definitely one of the most beautiful cupcakes they had, but unfortunately it was not nearly as delicious as it looked.

I know cupcakes are a trendy dessert that’s past its prime, but I do still love being able to have my own little cake treat when I can. Hopefully, this trend will become more popular in my new locale.
Lots of New Developments…
Posted on: November 1, 2010
- In: Cakes | Cookies | Personal
- Leave a Comment
The past few months have been monumental in my life. I have gone through two major life changes at once and I’ve found myself having to do a lot of adjusting. First thing’s first–I’m newly married! Yup, my grad student boyfriend proposed and became my fiance and then my husband. We eloped in Vermont in a lovely fancy-schmancy bed and breakfast in Stowe. It was a gorgeous, picturesque ceremony and we loved every minute of it!
After we came back from our elopement, we packed up my remaining belongings into my little car and drove to Illinois. So now I’m adjusting to married life and life in the mid-west. For a native New Yorker, this is a HUGE change! I’m fortunate in the sense that I’ve managed to find a nice job in a local bakery so I’m able to work on developing speed as a baker & cake decorator.
I do hope to regularly post again but my recent life changes have kept me from really keeping up with my writing. I have managed to keep up with my cake decorating skills since I did have an occasion to make another tiered cake. This time, the cake was for my husband, his family & friends as we celebrated our wedding at big bash thrown by his parents. This cake was a three tiered chocolate stout cake with amaretto mocha butercream. It was covered with chocolate fondant and decorated with gumpaste roses, carnations and foliage. It was a lot of work but it was a HUGE hit! I also made some mini-wedding cake cookies that were treats for the guests to take home. And now that I’m working in a bakery I get to make special cakes (and cookies) for many people on a daily basis! I’ve had many new developments in the past few months, but they’ve all been very sweet!
Oh and of course, here’s some shots of my cake & cookies.

chocolate stout cake

A few next steps…
Posted on: May 8, 2010
- In: Cakes | Personal
- Leave a Comment
After finishing my Wilton classes, I felt a bit unsure of what I should do next. Should I just experiment on my own? Take more classes?? If so, where and what? Well, in the past week or so, I’ve found a few answers to this question.
The first thing I did was to go to the Great American Cake show in Westminster, MD. I’ve never been to a cake show, but it sounded like fun and a good way to see what other things I should learn. I was right!! The show was AMAZING!! So many cakes from all levels were displayed–beginner to professional. They even had displays for cupcakes, cookies and peeps!! These weren’t so much displays as they were entries in the competitions but I just felt like it was great to see all the different cakes and different techniques used to decorate them. One of my favorite cakes was done by a teenager from Pennsylvania, Rafael Logrono of Rafael’s Cakes. Not only was his cake absolutely lovely, demonstrating a variety of techniques and artistic skills, but he’s a really super nice guy!! After working with teenagers, I’m always floored when I meet a lovely young man with skill and determination. He’s also a fabulous teacher. While at the show, I took a class in creating a sculpted purse. Check out my first ever sculpted purse!!
 I’ve never sculpted a cake before and Rafael really guided me through the process. His colleague, Amelia Monis of Sweet Alchemy by Amelia was also a great help since she helped me make sure my construction was good and she also answered questions along the way. This class, and all the shopping to do at the show were the best parts!!
I also decided I needed to learn to make gumpaste flowers. Yes, I’ve experimented with these before and had some exposure to gumpaste with my Wilton class, but I never really formally learned how to make wired gumpaste flowers. That is, until I took a class with the illustrious Colette Peters! She was a fabulous instructor since she broke down the construction of each flower into simple steps and was open to questions along the way. Not only did I get to go home with a bunch of lovely flowers that I intend to put on a cake for Mother’s day tomorrow but I went home with detailed instructions on how to make the flowers again!! I love when teachers give you a hand out of the most important information–seriously. I definitely want to take more classes from her since she creates an environment where you can really focus on your work and feel comfortable enough to ask questions. Check out my flowers!!

Peony

hydrangeas and nameless blossoms

hydrangeas and nameless blossoms

daisies

Roses

cala lilies
Maybe my next steps will be to experiment at home with some of the many cake books I’ve acquired or maybe even trying to view some cake decorating dvds? who knows? I just know I’m hooked on this art!!
- In: Cakes | Personal
- Leave a Comment
Now what?? I’ve completed all the Wilton cake decorating courses that are available to me locally. My life revolved around cake: baking, design, and decorating. And I LOVED it all! Yes, there were moments that were frustrating and yes I can see a lot of my mistakes. But, I learned a LOT and I can see a serious improvement. Remember my first fondant cake? Even though my fondant was saggy and bumpy I knew I was onto something. Unfortunately, this cake obsession has taken a toll on other things in my life. For example, I was delinquent from my Daring Baker’s Challenge this month. Not for lack of trying–I did try to find the suet and the pudding dish, but there was always work to be done on a cake. I’ve also fallen off the workout wagon, since I’ve been too wrapped up in making all the items for cakes and unable to spare any time for my elliptical trainer. This weekend I’m even going down to Maryland to check out a cake show. I’ve never been to one so I’m excited to see what goes on and maybe take a class or two.
So what kind of cake was I so focused on making to end this course? A shoebox cake!!! I also made a lid out of another layer of cake, tissue paper from gumpaste and a shoe from gumpaste. I even made a matching little purse to go with it. The cake itself was a lemon buttermilk pound cake with a french vanilla buttercream. It’s not as detailed as I would have liked, but it’s a good start!


Any suggestions on what I should do next??
Cake Madness
Posted on: April 25, 2010
- In: Baking | Cakes | Personal
- Leave a Comment
This week I had 3 cakes to do! THREE. This was the most cake I’ve ever had to produce for anything so needless to say I was busy non-stop this week. With each cake, I focused on different techniques to decorate them and to make them customized for the recipient and the event. I have to say I learned a LOT and am slowly thinking I’ve found something I’m not bad at! It’s so great to be able to make such delectable creations for friends and family while I’m still learning new techniques.
The first cake was a cake for my Wilton Fondant and Gumpaste course. This is a chocolate stout cake with french vanilla buttercream. I covered it in white fondant and made pink gumpaste carnations to top it. I also made a fondant border and piped a bead border and Cornelli lace. I took the cake to work and everyone loved it!

Fondant and gumpaste course cake
Here’s a shot of the inside of the cake.

The next cake was kind of a wedding cake. Some friends of mine recently got married, but they only had family there. I was told the day was lovely and of course completely hectic. It was so hectic in fact, that the bride informed me that there was a cake there, but she didn’t remember what kind it was or even much about it as she wasn’t in charge of getting it. So I offered to make the newly wedded couple a yummy cake for them to enjoy at their leisure and share with whomever they liked. This actually was a good idea since I managed to get the cake to them upon their one month wedding anniversary and there was plenty to go around.
I made them a two tier square cake decorated with gumpaste cherry blossom flowers and gumpaste origami cranes. Unfortunately, the cake got a little jostled while I was driving it over there and the fondant got a few nicks in it, but my friends didn’t mind at all. The top layer was a moist yellow cake with mocha amaretto buttercream. The top layer was a lemon cake with lemon curd and french vanilla buttercream. My friends loved it and they shared the cake with friends and family over the next couple of days. I was also really happy to give them a wedding gift that they’d enjoy and remember!

Origami and cherry blossom cake

The third cake was for a friend’s birthday party. It was a milestone birthday for him and so I decided to make him a really fun and yummy cake! Since one of his favorite hobbies is painting, I decided to paint the entire cake in different colors. I also knew he loved chocolate so I made the chocolate stout cake with french vanilla buttercream and mini chocolate chips. I thought a chocolate stout cake was fitting since his birthday was going to be celebrated in a bar. The cake was a real hit! He thought it was a delicious work of art!!


Even though it was such a hectic week, it was a lot of fun making all these cakes! Since my cake decorating classes are soon ending, I’m hoping I’ll be able to keep my skills sharp by making cakes for family and friends for all their different events.
Kitchen Experiment: Matzo Ball Soup
Posted on: April 5, 2010
- In: Cooking | Personal
- Leave a Comment
Unfortunately, I’ve recently come down with what I thought was a cold. I’ve been congested, coughing, sneezing and wheezing for a while and thanks to my great doctor, I’m finally getting better. What’s even worse is that my mom was sick too with this same bug, only it hit her much harder with aches and pains. The only thing I wanted to do was just stay in bed and sleep! I knew though that we both had to drink plenty of liquids and get as much rest as possible. I decided to make some chicken soup, since it’s the best home remedy ever. After two days of eating this soup, I wanted a variation so I decided to try my hand at making matzoh ball soup. Maybe I was inspired by the Passover holiday? Maybe I wanted some more substance to my soup? I don’t know what sparked this in me, but it was a great idea! The matzoh balls were easier to make than I thought and filled me with warmth and comfort since they were cooked in a delicious chicken broth. This recipe is super simple and easy to make. If you don’t like the matzoh balls, try adding some thin noodles to the soup, because, you know, chicken noodle soup is great too! This soup is just what you’ll crave when you’re feeling sick and it’s easy enough to make when you just want to stay in bed most of the day.
Kitchen Experiment: Matzoh Ball Soup
Yield: approximately 4 quarts
- 1 large Spanish onion, diced
- 4-5 carrots, peeled and diced
- 3-4 stalks of celery, diced
- 15-20 black peppercorns
- 2 bay leaves
- 1-2 teaspoons dried thyme
- 8-10 stems of fresh parsley
- 3-4 stems of fresh dill
- 1 chicken, preferably organic
- 1 box matzo meal
- 2 large eggs
- 2 tablespoons vegetable oil (I used canola)
- 1 teaspoon salt
- 1 tablespoons chicken broth
- 1/2 head cabbage, thinly sliced
- Dice your onion, carrots and celery. You should have about twice as much diced onion as you do of diced carrots and celery combined. If not, then add more of whatever you need to achieve this ratio of 2 parts onion to 1 part carrot and celery.
- Prepare your sachet. In a piece of cheesecloth (if you don’t have any you can always use gauze that doesn’t have any elastic) place the peppercorns, bay leaves, thyme, parsley and dill. Tie your sachet so that all your herbs are secure.
- Prepare your chicken. Remove the gizzards and cut off any excess fat along the tail. Rinse the chicken until the water runs clear, taking care to remove any internal organs that remain.
- In a large 6 quart pot over low, add your onion, carrots and celery and add the chicken. (If you like the gizzards and neck, do add them! I did and they gave a wonderful richness to the soup.)
- Add enough water to the pot to cover the vegetables and the chicken and add your sachet.
- Now walk away! Do not stir, turn or disturb this pot! Also, be sure you never have a rolling boil. If you do see vigorous boiling about to occur, reduce your heat. Come back in about 40 min (or an hour) and you will see some foam rising to the top. Gently skim this from the top without disturbing the rest of the contents.
- Repeat the skimming process every 30 minutes or so for the next hour.
- Meanwhile, prepare the matzo balls. In a large bowl, beat together the eggs, oil, salt and matzo meal. Add broth (I used broth from the pot) and mix until uniform. Refrigerate for about 30 minutes.
- At this point your soup has been gently simmering away for about 2 hours. Remove your chicken, taking care to retrieve any parts that might be falling off. Shred all the meat of your chicken and return it to the pot.
- Add the cabbage and cook until tender. (If you’re using noodles, add them at this point and cook until tender.) If you’re preparing the matzo balls, remove them from the refrigerator and form them into balls. Be aware that they will swell when cooking!
- Into a smaller pot, ladle enough broth so that it will cover the matzo balls. Cover the pot and bring the broth to a boil.
- Add the matzo balls and cook for about 30 minutes.
- To serve, ladle soup and 2 matzo balls into a large bowl. Top with some freshly chopped dill.

Matzo ball soup
This soup is delicious and satisfying! For those or you more familiar with matzo ball soup, this recipe for the matzo balls are basically the recipe on the back of the box only I cooked them in broth instead of water. Of course, I have no idea if these are considered hard or soft and I wasn’t even aware of this debate until recently. I just know my soup was good and easy enough to make when I felt super sick!
Completed Wilton Course 3!!
Posted on: March 31, 2010
- In: Cakes
- Leave a Comment
The past few weeks have been very hectic. I’ve been getting over a cold and my mother has also been quite ill. Unfortunately, I was unable to complete my daring baker’s challenge because I was just not feeling well at all and I’ve been trying to help my mom since she’s been ill too. But I did manage to still complete my Wilton Course 3 cakes. Since I haven’t done too much fondant work, I also made some other cakes using the techniques I learned in the class so that I can improve my skills and really familiarize myself with fondant. I also tried a few different recipes since I had most of the ingredients around the house. I have to say that while I do love working with fondant since it just creates such a sophisticated look, I still think that cakes are not really complete without some kind of piping work. I was glad we got to learn more piped flowers in this class, but of course, I wish we were able to practice more. I’m really looking forward to the next course which focuses on fondant and gumpaste! Here’s some shots of my most recent cakes from wilton 3.

This is a peanut butter and jelly cake filled with strawberry jelly and iced with cream cheese buttercream. This was the first fondant cake from my wilton 3 class.

This is an almond walnut pound cake filled and iced with french vanilla buttercream. I used the royal icing flowers from a previous wilton class.

This is the finale cake for my wilton 3 class. It's a vanilla bean chiffon cake with a lime curd and a coconut rum buttercream. The cake is covered in fondant and the boarder is done in buttercream shells. The roses and leaves used to top the cake at the end are made from a mixture of fondant and gumtex. The flowers and leaves were attached using royal icing.

Since I had leftover batter from my finale cake, I made these peep cupcakes. I didn't have enough peeps for all 12 so I used royal icing flowers from a previous wilton class.
It’s a cake extravaganza!!
Posted on: March 15, 2010
- In: Cakes | Personal
- Leave a Comment
So lately, I’m obsessed with cake. Not eating it–making it, decorating it, reading about it, talking about it and any other things I can do that have to do with cake. I pay way too many visits to the cake decorating supply store. And I’ve been spending a lot of time trying out different recipes, practicing techniques, and rolling out fondant. My Wilton courses have really opened my eyes since I’ve finally been exposed to the variety of styles and decorations out there. But really I owe my real cake educational development to courses I’ve staged and attended at ICE. I also credit a lot of my recent development to reading different books. Reading the Ace of Cakes book, as well as books by Colette Peters and Toba Garrett have both inspired and challenged me to try new techniques and mediums. As inspired as I am, I know it all has to start with good fundamentals, so I’m spending this rainy weekend baking cakes and decorating them for spring and St. Patrick’s Day. I’ll be giving away these cakes, so I want to be sure they’ll taste good, but most of all want them to be beautiful and lovely cakes!
My St. Patrick’s Day cake is a homemade funfetti cake. Basically, I used a white cake recipe I got from school and just added some colorful sprinkles. I figured the colors would be fun for the holiday.

Funfetti cake for St Patrick's Day
The other two cakes were made from recipes from Toba Garrett’s book, The Well Decorated Cake. That’s a great book with wonderful techniques and most importantly, delicious recipes. I made her chocolate fudge recipe which was delicious!! And I filled it with a banana filling and iced it with mocha buttercream. The bananas made the cake have kind of a caramel taste and kept it really moist. And it was really simple to make! This can be considered kind of a spin off a bananas foster. If you’d like to try it, here’s my recipe for the banana filling.
Banana Filling
Yield: just under 2 cups
Ingredients:
- 4 bananas, diced (I used bananas that were just ripe enough to eat, but I suspect using underripe bananas would be fine too.)
- 1/2 cup dark brown sugar
- pinch salt
- 2 ounces butter
- 1/4 cup milk
- 1/4 tsp cinnamon
- 1/2 tsp vanilla
- pinch fresh ground nutmeg
- 1/4 cup good brandy or cognac (I used some Remy Martin I already had around.)
- In a heated medium sized pan, melt the butter.
- Add the sugar and stir to combine thoroughly.
- Add the bananas and cook until very soft, stirring occasionally about 5 minutes.
- Add the milk, cinnamon, vanilla, and nutmeg and stir to combine.
- Add the cognac and tilt your pan to ignite. IMMEDIATELY REMOVE FROM THE HEAT! This part is very cool, and VERY DANGEROUS, so BE CAREFUL and DO NOT return pan to the heat until the flames have died. Be sure to have a lid or other pan at the ready to cover this pan if the flames get out of hand. THIS PART IS NOT REQUIRED!!! Just be sure to incorporate everything very well and cook off the alcohol.
- Allow to cool before using to fill your cake.

Chocolate Fudge cake with banana filling

Royal Icing Daisies

Time for a slice!

In case you’re wondering, everything was made from scratch! I made the cakes, fillings, frosting and even the fondant! The last cake I made was the peanut butter & jelly cake from the same publication as the chocolate fudge cake. I didn’t decorate it this weekend though as I’m saving it for my cake decorating class later this week.
Completed Wilton Course 2!
Posted on: March 9, 2010
- In: Cakes
- Leave a Comment
Last week I finished my second Wilton Cake decorating course! I have to say this time I really did learn a lot! The focus of this course is more piping work along with piping in royal icing and we made flowers in royal icing. I’ve never made flowers other than the buttercream roses so this was a challenge to try to keep straight how to make all the different petals for the different flowers and remember their different parts. Since I’m not too into flowers to being with it was just a challenge remembering what they all looked like. Of course with a lot of practice, I did eventually get some lovely flowers. And I’m sure with a LOT more practice I’ll have even nicer flowers! I do have to say that I think piping with royal icing is almost easier since you can get nice edges and peaks where you want them.
We learned how to pipe violets, violet leaves, mums, daisies, pansies, apple blossoms, and I’m sure there’s more I’m forgetting. We also learned how to make reverse shells, rope borders and how to do a basketweave. The basketweave was by far the most difficult piping I’ve had to do yet! However, I do really think it’s a nice look for a cake. Combining the basketweave with flowers, marzipan fruits or maybe some other Easter/Spring imagery I think the basketweave can make any cake look very sweet and still polished. My finale cake had a decent basket weave in green. I chose green because I then added flowers all over the cake and I wanted the green to stand in for any foliage that would be under the flowers. The cake was an almond paste cake with french vanilla buttercream.
And since the student kit came with 2 pans, I was able to make 2 cakes. The next cake was also an almond cake with french vanilla buttercream but I decorated it with royal icing flowers and marzipan fruits. I’m now onto course 3 and the wonderful world of fondant!
Here’s some shots of my cakes! 🙂

My Wilton course 2 finale cake

A sweet spring cake
This month’s challenge was Tiramisu and I have to admit I was really excited. When I was in college, I was obsessed with this dessert and I sought out the best tiramisus throughout the city. One cafe in the village called La Lanterna, had the best tiramisu I had ever had and I often went there for some espresso and a nice tiramisu. Eventually, I tried to make it but I was never as thorough as this recipe. I always used store-bought savoiardi cookies and mascapone. I also don’t remember ever making a true zabaglione. Of course I eventually got sick of this dessert and didn’t make it again until now. Even though this recipe required some planning ahead of time to applow for the proper refrigeration of the components as well as the completed dish, it was well worth all the efforts! The savoiardi were better than store bought and the combination of pastry cream, zabaglione and fresh mascapone made for a rich and delicious cream.
Here’s some shots of my savoiardi as well as my finished tiramisu. If you’re daring enough to try this recipe, continue reading for all the various steps.
-
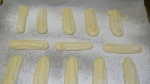
- Savoiardi Ready to Bake

-
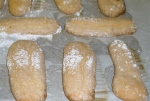
- Freshly baked savoiardi

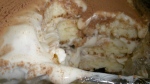
-

- Finished tiramisu

-
- First slice…chcek out those layers!

-
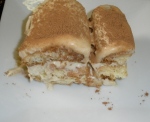
- My first taste! Yummy!


The February 2010 Daring Bakers’ challenge was hosted by Aparna of My Diverse Kitchen and Deeba of Passionate About Baking. They chose Tiramisu as the challenge for the month. Their challenge recipe is based on recipes from The Washington Post, Cordon Bleu at Home and Baking Obsession.
RECIPE SOURCE:
Mascarpone Cheese – Vera’s Recipe (Baking Obsession) for Homemade Mascarpone Cheese.
Savoiardi/ Ladyfinger Biscuits – Recipe from Cordon Bleu At Home
Tiramisu – Carminantonio’s Tiramisu from The Washington Post, July 11 2007
The recipes for this challenge are presented in the following order:
A. Tiramisu (includes zabaglione & vanilla pastry cream)
B. Mascarpone Cheese
C. Ladyfinger/ Savoiardi Biscuits
MANDATORY:
You MUST make your own savoiardi / ladyfinger biscuits and mascarpone cheese with the given recipes. You must also make the zabaglione and pastry cream using the given recipes.
If diet or health restrictions do not allow you to use these recipes, please go ahead and use one of the alternatives provided or other suitable recipes to make them, but please include links to the original recipe in your DB post.
Sponge cake may be not be used as a substitute. After all, a large part of this challenge is making those biscuits.
TIRAMISU
(Recipe source: Carminantonio’s Tiramisu from The Washington Post, July 11 2007 )
This recipe makes 6 servings
Ingredients:
For the zabaglione:
2 large egg yolks
3 tablespoons sugar/50gms
1/4 cup/60ml Marsala wine (or port or coffee)
1/4 teaspoon/ 1.25ml vanilla extract
1/2 teaspoon finely grated lemon zest
For the vanilla pastry cream:
1/4 cup/55gms sugar
1 tablespoon/8gms all purpose flour
1/2 teaspoon finely grated lemon zest
1/2 teaspoon/ 2.5ml vanilla extract
1 large egg yolk
3/4 cup/175ml whole milk
For the whipped cream:
1 cup/235ml chilled heavy cream (we used 25%)
1/4 cup/55gms sugar
1/2 teaspoon/ 2.5ml vanilla extract
To assemble the tiramisu:
2 cups/470ml brewed espresso, warmed
1 teaspoon/5ml rum extract (optional)
1/2 cup/110gms sugar
1/3 cup/75gms mascarpone cheese
36 savoiardi/ ladyfinger biscuits (you may use less)
2 tablespoons/30gms unsweetened cocoa powder
Method:
For the zabaglione:
Heat water in a double boiler. If you don’t have a double boiler, place a pot with about an inch of water in it on the stove. Place a heat-proof bowl in the pot making sure the bottom does not touch the water.
In a large mixing bowl (or stainless steel mixing bowl), mix together the egg yolks, sugar, the Marsala (or espresso/ coffee), vanilla extract and lemon zest. Whisk together until the yolks are fully blended and the mixture looks smooth.
Transfer the mixture to the top of a double boiler or place your bowl over the pan/ pot with simmering water. Cook the egg mixture over low heat, stirring constantly, for about 8 minutes or until it resembles thick custard. It may bubble a bit as it reaches that consistency.
Let cool to room temperature and transfer the zabaglione to a bowl. Cover and refrigerate at least 4 hours or overnight, until thoroughly chilled.
For the pastry cream:
Mix together the sugar, flour, lemon zest and vanilla extract in a medium heavy-bottomed saucepan. To this add the egg yolk and half the milk. Whisk until smooth.
Now place the saucepan over low heat and cook, stirring constantly to prevent the mixture from curdling.
Add the remaining milk a little at a time, still stirring constantly. After about 12 minutes the mixture will be thick, free of lumps and beginning to bubble. (If you have a few lumps, don’t worry. You can push the cream through a fine-mesh strainer.)
Transfer the pastry cream to a bowl and cool to room temperature. Cover with plastic film and refrigerate at least 4 hours or overnight, until thoroughly chilled.
For the whipped cream:
Combine the cream, sugar and vanilla extract in a mixing bowl. Beat with an electric hand mixer or immersion blender until the mixture holds stiff peaks. Set aside.
To assemble the tiramisu:
Have ready a rectangular serving dish (about 8″ by 8″ should do) or one of your choice.
Mix together the warm espresso, rum extract and sugar in a shallow dish, whisking to mix well. Set aside to cool.
In a large bowl, beat the mascarpone cheese with a spoon to break down the lumps and make it smooth. This will make it easier to fold. Add the prepared and chilled zabaglione and pastry cream, blending until just combined. Gently fold in the whipped cream. Set this cream mixture aside.
Now to start assembling the tiramisu.
Workings quickly, dip 12 of the ladyfingers in the sweetened espresso, about 1 second per side. They should be moist but not soggy. Immediately transfer each ladyfinger to the platter, placing them side by side in a single row. You may break a lady finger into two, if necessary, to ensure the base of your dish is completely covered.
Spoon one-third of the cream mixture on top of the ladyfingers, then use a rubber spatula or spreading knife to cover the top evenly, all the way to the edges.
Repeat to create 2 more layers, using 12 ladyfingers and the cream mixture for each layer. Clean any spilled cream mixture; cover carefully with plastic wrap and refrigerate the tiramisu overnight.
To serve, carefully remove the plastic wrap and sprinkle the tiramisu with cocoa powder using a fine-mesh strainer or decorate as you please. Cut into individual portions and serve.
MASCARPONE CHEESE
(Source: Vera’s Recipe for Homemade Mascarpone Cheese)
This recipe makes 12oz/ 340gm of mascarpone cheese
Ingredients:
474ml (approx. 500ml)/ 2 cups whipping (36 %) pasteurized (not ultra-pasteurized), preferably organic cream (between 25% to 36% cream will do)
1 tablespoon fresh lemon juice
Bring 1 inch of water to a boil in a wide skillet. Reduce the heat to medium-low so the water is barely simmering. Pour the cream into a medium heat-resistant bowl, then place the bowl into the skillet. Heat the cream, stirring often, to 190 F. If you do not have a thermometer, wait until small bubbles keep trying to push up to the surface.
It will take about 15 minutes of delicate heating. Add the lemon juice and continue heating the mixture, stirring gently, until the cream curdles. Do not expect the same action as you see during ricotta cheese making. All that the whipping cream will do is become thicker, like a well-done crème anglaise. It will cover a back of your wooden spoon thickly. You will see just a few clear whey streaks when you stir. Remove the bowl from the water and let cool for about 20 minutes. Meanwhile, line a sieve with four layers of dampened cheesecloth and set it over a bowl. Transfer the mixture into the lined sieve. Do not squeeze the cheese in the cheesecloth or press on its surface (be patient, it will firm up after refrigeration time). Once cooled completely, cover with plastic wrap and refrigerate (in the sieve) overnight or up to 24 hours.
Vera’s notes: The first time I made mascarpone I had all doubts if it’d been cooked enough, because of its custard-like texture. Have no fear, it will firm up beautifully in the fridge, and will yet remain lusciously creamy.
Keep refrigerated and use within 3 to 4 days.
LADYFINGERS/ SAVOIARDI BISCUITS
(Source: Recipe from Cordon Bleu At Home)
This recipe makes approximately 24 big ladyfingers or 45 small (2 1/2″ to 3″ long) ladyfingers.
Ingredients:
3 eggs, separated
6 tablespoons /75gms granulated sugar
3/4 cup/95gms cake flour, sifted (or 3/4 cup all purpose flour + 2 tbsp corn starch)
6 tablespoons /50gms confectioner’s sugar,
Method:
Preheat your oven to 350 F (175 C) degrees, then lightly brush 2 baking sheets with oil or softened butter and line with parchment paper.
Beat the egg whites using a hand held electric mixer until stiff peaks form. Gradually add granulate sugar and continue beating until the egg whites become stiff again, glossy and smooth.
In a small bowl, beat the egg yolks lightly with a fork and fold them into the meringue, using a wooden spoon. Sift the flour over this mixture and fold gently until just mixed. It is important to fold very gently and not overdo the folding. Otherwise the batter would deflate and lose volume resulting in ladyfingers which are flat and not spongy.
Fit a pastry bag with a plain tip (or just snip the end off; you could also use a Ziploc bag) and fill with the batter. Pipe the batter into 5″ long and 3/4″ wide strips leaving about 1″ space in between the strips.
Sprinkle half the confectioner’s sugar over the ladyfingers and wait for 5 minutes. The sugar will pearl or look wet and glisten. Now sprinkle the remaining sugar. This helps to give the ladyfingers their characteristic crispness.
Hold the parchment paper in place with your thumb and lift one side of the baking sheet and gently tap it on the work surface to remove excess sprinkled sugar.
Bake the ladyfingers for 10 minutes, then rotate the sheets and bake for another 5 minutes or so until the puff up, turn lightly golden brown and are still soft.
Allow them to cool slightly on the sheets for about 5 minutes and then remove the ladyfingers from the baking sheet with a metal spatula while still hot, and cool on a rack.
Store them in an airtight container till required. They should keep for 2 to 3 weeks.
